FastRobots
ECE4160/5160-MAE 4190/5190: Fast Robots course, offered at Cornell University in Spring 2024
This project is maintained by FastRobotsCornell
Fast Robots @ Cornell
Lab 6: Orientation Control
Objective
The purpose of this lab is to get experience with orientation PID using the IMU. In Lab 5, PID control was done on wall distance using the TOF sensors, this lab will involve controlling the yaw of your robot using the IMU. Like last lab, you can pick whatever controller works best for your system. 4000-level students can choose between P, PI, PID, PD; 5000-level students can choose between PI and PID controllers. Your hand-in will be judged upon your demonstrated understanding of PID control and practical implementation constraints, and the quality of your solution.
This lab is part of a series of labs (5-8) on PID control, sensor fusion, and stunts.
Parts Required
- 1 x R/C stunt car
- 1 x SparkFun RedBoard Artemis Nano
- 1 x USB cable
- 2 x Li-Po 3.7V 650mAh (or more) battery
- 2 x Dual motor driver
- 2 x 4m ToF sensor
- 1 x 9DOF IMU sensor
- 1 x Qwiic connector
Lab Procedure
Orientation Control
For this lab, we will work on implementing stationary (in place) orientation control. The control signal (output from the PID controller) will be a differential drive value. The wheel should be driven at the same speed in opposite directions in order to control the orientation of the robot as shown in the video below. Some considerations to think about when implementing your controller:
PID Input Signal
- You should integrate your gyroscope to get an estimate for the orientation of the robot.
- Are there any problems that digital integration might lead to over time? Are there ways to minimize these problems?
- Does your sensor have any bias, and are there ways to fix this? How fast does your errow grow as a result of this bias? Conisder using the onboard digital motion processor (DMP) built into your IMU to minimize yaw drift.
- Are there limitations on the sensor itself to be aware of? What is the maximum rotational velocity that the gyroscope can read (look at spec sheets and code documentation on github). Is this sufficient for our applications, and is there was to configure this parameter?
Derivative Term
- Does it make sense to take the derivative of a signal that is the integral of another signal.
- Think about derivative kick. Does changing your setpoint while the robot is running cause problems with your implementation of the PID controller?
- Is a lowpass filter needed before your derivative term?
Programming Implementation
- Have you implemented your code in such a way that you can continue sending an processing Bluetooth commands while your controller is running?
- This is essential for being able to tune the PID gains quickly.
- This is also essential for being able to change the setpoint while the robot is running.
- Think about future applications of your PID controller with regards to navigation or stunts. Will you need to be able to update the setpoint in real time?
- Can you control the orientation while the robot is driving forward or backward? This is not required for this lab, but consider how this might be implemented in the future and what steps you can take now to make adding this functionality simple.
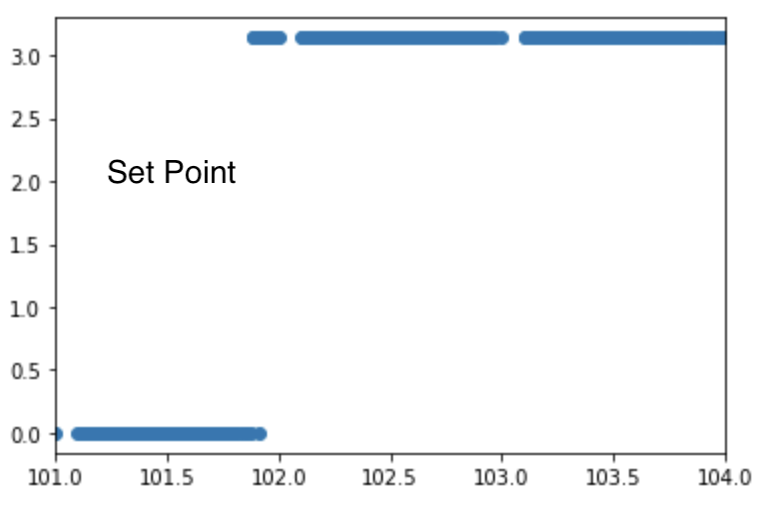
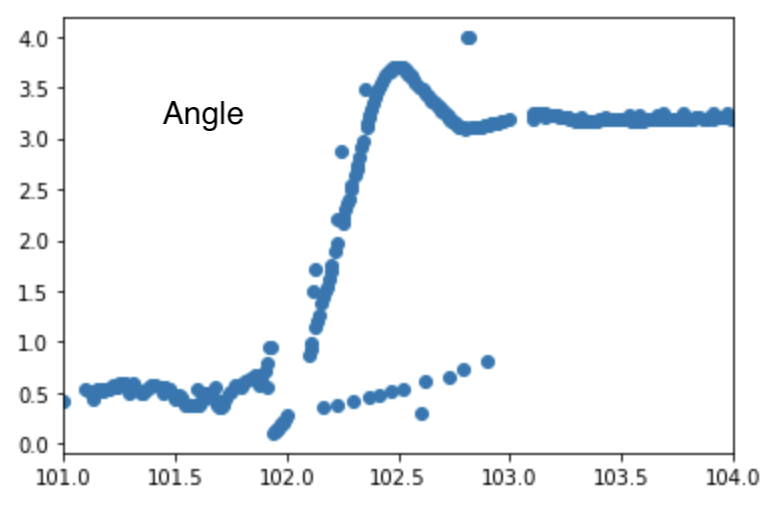
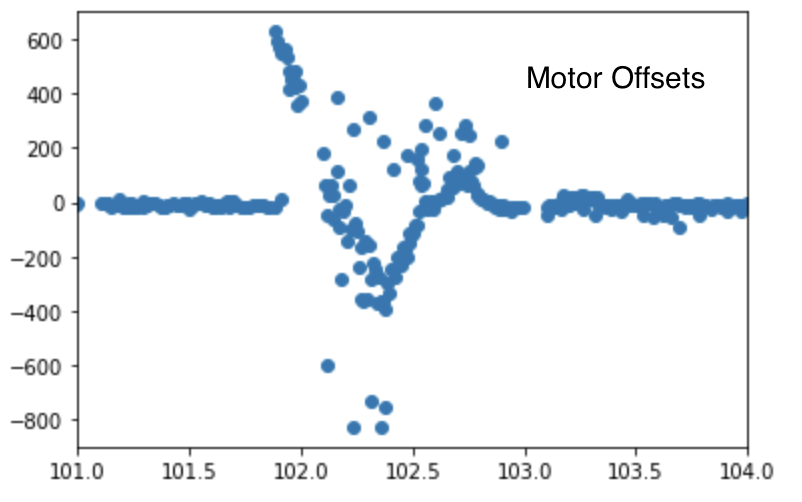
Include graphs of all appropriate measurements needed to debug your PID controller. Below is an example the set point, angle and motor offset plotted as a function of time. Observe the overshoot and settling time of the angle and the response of the motor values.


Tasks for 5000-level students
Implement wind-up protection for your integrator. Argue for why this is necessary (you may for example demonstrate how your controller works reasonably independent of floor surface).
Write-up
Word Limit: < 800 words
Webpage Sections
This is not a strict requirement, but may be helpful in understanding what should be included in your webpage. It also helps with the flow of your report to show your understanding to the lab graders. This lab is more open ended in terms of the steps taken to reach the end goal, so just make sure to document your process you take to complete your task, including testing and debugging steps!
- Prelab
- Clearly describe how you handle sending and receiving data over Bluetooth
- Consider adding code snippets as necessary to showcase how you implemented this on Arduino and Python
- Lab Tasks
- P/I/D discussion (Kp/Ki/Kd values chosen, why you chose a combination of controllers, etc.)
- Range/Sampling time discussion
- Graphs, code, videos, images, discussion of reaching task goal
- Graph data should at least include theta vs time (you can also consider angular velocity, motor input, etc)
- (5000) Wind-up implementation and discussion
Add code (consider using GitHub Gists) where you think is relevant (DO NOT paste your entire code).
